(U-Blox NEO-M9N GNSS Configuration: Last updated by Benjamin on February 25, 2024)
Our AHRS uses the NEO-M9N GNSS receiver from the Swiss manufacturer U-Blox. This receiver provides exceptional sensitivity and acquisition times. It simultaneously uses four satellite constellations: GPS, Galileo, Beidou, and Glonass. Combined with jamming and spoofing events detection and advanced filtering algorithms, the high number of visible satellites (allowing the receiver to select the best signals) provides the system with meter-level accuracy.
The NEO-M9N may communicate with its environment by simultaneously using one or more of the following ports: USB-C, UART, I2C, and SPI.
This receiver uses standard NMEA and RTCM protocols and the proprietary UBX protocol. The latter is bidirectional. It allows the output of UBX messages used for navigation (these messages are the equivalent of NMEA sentences well known to GPS users) and the reception of UBX configuration messages from a computer or a microcontroller. The term “message” is omnipresent in the U-Blox GNSS ecosystem. This receiver has countless configuration options to meet the needs of all users. This significant number of functionalities gives it an apparent complexity that can be disconcerting at first sight. The volume of documentation (several hundred pages) contributes to this impression of complexity.
This page aims to allow the reader to configure his GNSS receiver easily using the u-Center software from U-Blox to integrate it seamlessly into the AHRS.
Installing the U-Center software
First, download the U-Center version adapted to the NEO-M9N from this page. The installation program guides you through the necessary steps for a successful program installation. The reader can refer to the U-Center user guide.
When the installer has completed, exit the U-Center. Connect the GNSS receiver to the computer via a USB-A to USB-C cable. The receiver is then powered through the USB port; it is automatically recognized by the computer, which displays the usual configuration messages for a new device until it is declared ready to use. Connect an antenna to the receiver, and wait for the fix (the blue LED starts flashing). A cold start takes no longer than one minute if the antenna has an unobstructed view of the sky. Then, launch the u-Center application.
A slight peculiarity of this software: when the mouse pointer hovers over an option or a button, a description of this element may sometimes only be displayed at the bottom left of the window, in the status bar, without a tooltip message, so remember to look there.
Receiver connection to the U-Center
This video shows the U-Center interface in Windows and how to establish the connection, configure the transmission speed, and then view the sentences or messages sent by the GNSS receiver in the text console.
Essential options in the View menu
Five options in the View menu are particularly helpful.
– The Text Console option can almost do without any comments. If the GNSS receiver has been configured (see below) to output NMEA sentences (messages) on the USB port (this is the case with the factory settings), they are displayed in plain text in this console. You can lock/unlock scrolling with the small yellow padlock at the bottom left of the console. There are other buttons next to the padlock. See descriptions in the status bar when hovering over them with the mouse pointer. If the receiver is configured to output UBX messages on the USB port, these binary messages do not appear in the text console.
– The Packet Console option displays the name, size, and nature (but not the content) of all the messages sent or received by the receiver on its USB port. In the initial factory configuration, we see in this video that there are only NMEA messages (a lot of them…) and no UBX messages. We will see below how to add UBX messages to one of the receiver outputs.
– The Binary Console option displays all messages transmitted on the USB port in binary and ASCII formats.
– The Message View option opens a window where all possible messages are listed. There are different sections for the NMEA and UBX protocols. For example, if you click in the NMEA protocol on the GxRMC message (active with the factory settings), the box on the right displays a complete dynamic decoding of the RMC sentences; see this video. By default, the message output frequency is 1 HZ. We will see later how to modify this frequency.
– The Generation 9 Configuration View option allows you to configure the GNSS receiver. It is better to use this option for the NEO-M9N rather than the plain Configuration View option, which should be reserved for previous generations of U-Blox receivers. Before exploring this option, there are two essential things to know. The first involves resetting the receiver to the factory settings, saving the current settings, and loading a previous configuration. The second one is about the receiver’s memories.
Resetting the receiver to the factory settings
Just click on the button indicated by the red arrow in the figure below.
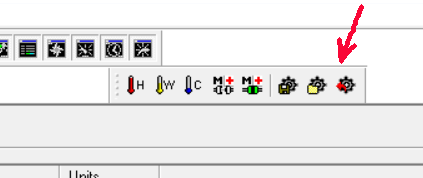
This option is very helpful. It allows you to perform all the configuration tests you want, with the assurance of being able to return to the initial configuration that works well if things go wrong.
Backing up and restoring a configuration
The two buttons to the left of the one indicated by the red arrow in the above figure are used to save the current receiver configuration in BBR/Flash memory (see below the paragraph about memories) or to revert to the last saved one (and only the last one). You can save multiple configurations, give them custom names, or load them using the Tools -> Receiver Configuration menu. To do this, the reader can refer to pages 64-65 of the u-Center user guide. See the link to this guide at the bottom of this page.
To quickly configure your GNSS using the configuration file that you can download from the AHRS page, you must open the Tools -> Receiver Configuration menu, then select the desired file, and in the “Load configuration” box, click on the button “Transfer file -> GNSS”.
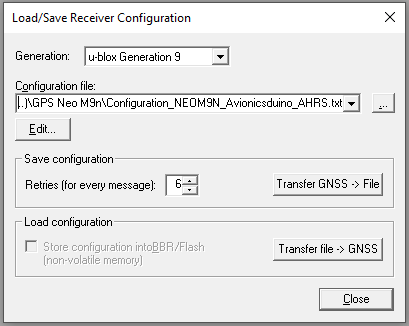
Warning: the “Store configuration into BBR/Flash” checkbox is grayed out and inactive. This checkbox is only usable by older GNSS models. Therefore, the configuration file is only loaded into volatile RAM memory after clicking the “Transfer file -> GNSS” button. For the next time the GNSS is powered on, saving it in BBR/Flash memory is essential.
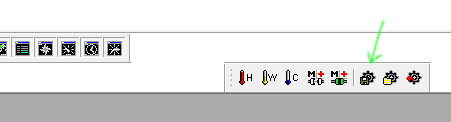
To do this, click the button where the green arrow points in the figure below.
NEO-M9N memories
There are four different memory types inside the receiver.
– The ROM (Read Only Memory) contains a copy of the firmware.
– The RAM (Random Access Memory) is where the system’s temporary data or run-time data is stored. It also contains a copy of the firmware and the configuration parameters. It is erased when the receiver is switched off.
– The BBR (Battery Backed RAM) is an area of RAM that continues to be powered by a battery after the receiver is turned off. Configuration parameters stored in BBR will be saved as long as the battery charge level allows it to power the BBR.
– The Flash Memory is non-volatile. It also contains a copy of the firmware, which can be updated on the U-Blox site. This copy is used when the system is powered up. During boot, the copy in ROM will be used if a valid flash firmware image is undetected. Configuration parameters may also be stored in flash memory.
When modifying configuration parameters, the U-Center allows selecting in which memory these modifications must be saved.
Adding or removing messages on a receiver output
In this video, the UBX-NAV-PVT message is added to the UART1 output. Messages appearing in gray are not available on the NEO M9N model. Note a U-Center bug: the UART2 output options should be grayed out since only one UART is available on the NEOM9N.
For the AHRS to work properly, several other UBX-NAV messages must also be activated on the UART1 output. The reader will find the list at the bottom of the AHRS page. Their activation is done in the same way.
Concerning the UBX-NAV-PVT message, one of the most used, the curious reader can find its binary description on page 136 of the “Interface Description Guide”; a link to this guide is at the bottom of this page. The structure of UBX messages is explained in chapter 3 of this guide, page 43. The data types used are described in paragraph 3.3.5, page 44.
Modifying message output frequency
Demonstration in this video. A CFG-RATE-MEAS configuration message (MEAS for measurements) must be sent to the receiver. “Measurements” are calculated from received satellite data. By default, a measurement is performed every 1000 ms. Instead, in the video, we will ask the GNSS receiver to provide us with 20 measurements per second, so one measurement every 50 ms. Also, by default, the receiver sends a “navigation solution” to the relevant output (i.e., a series of NMEA and/or UBX messages containing the measurement results) at each measurement cycle. You can ask the GNSS to send a navigation solution only every x measurement cycles; this is the purpose of the CFG-RATE-NAV message. So if we also send a CFG-RATE-NAV message, for example, 5, we will have 20 measurements per second but only four navigation solutions per second, which would, in practice, be of no interest to our AHRS. We, therefore, leave CFG-RATE-NAV on 1 by default.
At the end of the video, after sending the 50 ms CFG-RATE-MEAS message to the receiver (only in RAM), we actually obtain 20 UBX-NAV-PVT messages, 20 NMEA-RMC sentences and 20 NMEA- VTG sentences per second.
Configuring outputs
There are many options for configuring outputs. In this video, we see how to configure the baud rate of the UART port, which is used in the AHRS for communication between the GNSS receiver and the Teensy 4.0 board. The other UART settings are standard, and default options need not be changed. The curious reader may discover the settings of the different outputs, I2C and SPI, not used in the AHRS.
References
NEO-M9N: u-blox M9 standard precision module Data sheet